
A DIY Ayurvedic shampoo does everything a shampoo should do.
Most importantly – it does not add to the planet’s carbon footprint and can be a useful part of your eco-friendly beauty routine.
They contain in them natural surfactants (agents that clean the hair of dirt and oil). They are able to close the cuticles to keep the inside of the hair safe and balance the pH of the hair and scalp.
These shampoos are cheaper, environment friendly, and without the toxic elements present in commercial versions.
And they are clearly tried and tested, being based on the 5000-year old Indian practice of Ayurveda. So, we can assume that whatever had to go wrong has gone wrong in the first few hundred years of trial and error. Just saying.
But please note that these are herbal medicines so make sure to do a patch test before application.
DIY Ayurvedic shampoo recipe
I’ve tried many DIY shampoo formulas over the last many years and this one’s my favorite. I find it to be gentle on my hair and scalp and it maintains the pH balance in both.
However, it is not set in stone and you can move the pieces around to suit your type of hair. That’s the beauty about DIY, no? The ability to make your own recipes?
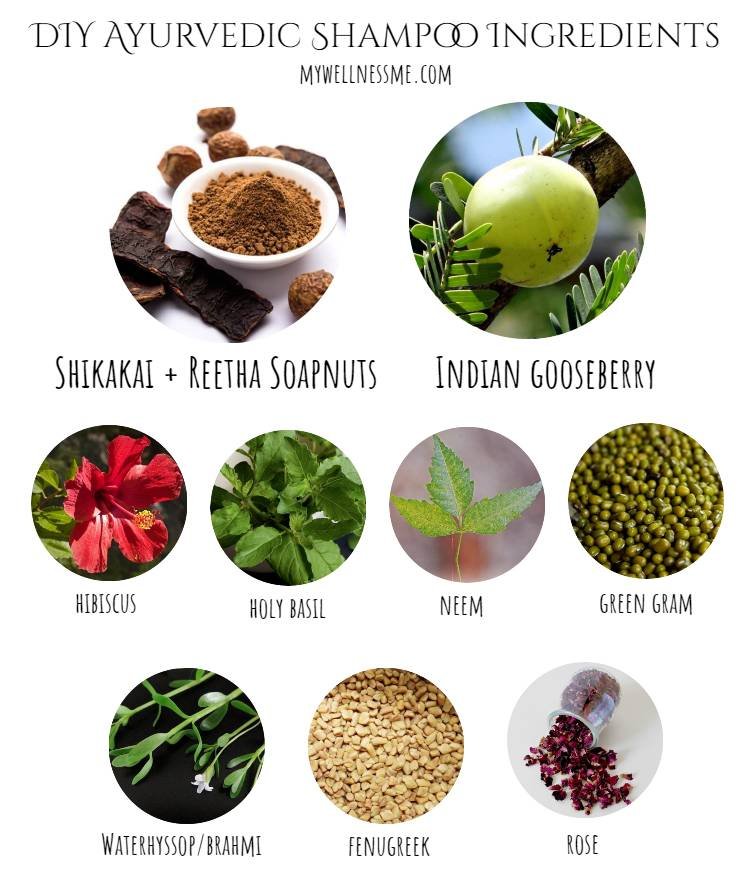
Here’s the ammo I use. (These are all in powdered form which I prefer for the longer shelf life. Most can be found in Indian grocery stores or you can simply buy them online. If the stores only have these ingredients in their solid dry state, powder them in a blender after deseeding them)
- 25 gm shikakai
- 50 gm reetha
- 25 gm indian gooseberry/amla
These three generally form the base of most Ayurvedic shampoos, though you can go with either shikakai or reetha in combination with amla. The first two are natural surfactants while amla has enriching properties for both hair and scalp.
In this recipe we are also going to add:
- 25 gm hibiscus
- 25 gm neem
- 25 gm holy basil
- 25 gm fenugreek
- 25 gm rose
- 25 gm waterhyssop/brahmi
- 25 gm green gram
- 25 gm sandalwood (optional)
To start off, blend all the powders into a fine mixture.
How to use
Take about 4 tbsp of the powdered mix and add distilled water. Alternatively you can use rose water or yoghurt. Beat the mixture into a runny texture.
Keep the rest of the powder in an air-tight bottle away from any sort of moisture.
Four tablespoons is perfect for short hair. If you have longer hair, use more; if you are Rapunzel, you’ll need a bucket.
Personally, I leave this mix overnight before application but that’s not a strict rule. Still, I recommend you keep it aside for at least three hours before treating your hair.
Also, beat the mixture once just before application to make sure of its smoothness and get rid of any lumps. Don’t expect a lot of lather like commercial shampoos but this will do an equally good cleaning job.
We will soon talk about the particular qualities of the ingredients that make up this DIY Ayurvedic shampoo.
But first let’s look at the importance of pH in a shampoo and why low is better.
Why low pH is good for our hair
The pH of a human hair is between 4.5 and 5.5.
What does this mean?
In lay terms, the scale ranges from 0 to 14 with the lowest number being the most acidic and 14 the most alkaline. Right in the middle is water with a “neutral” pH of 7.
By this yardstick, our hair is somewhat acidic in nature and our shampoo should also be acidic, ideally around the pH of our hair for optimum benefits.
This is why it is important to test the shampoo mixture to ensure that the pH level is around 3-6. Opinions vary on the ideal pH but you should be safe around this mark.
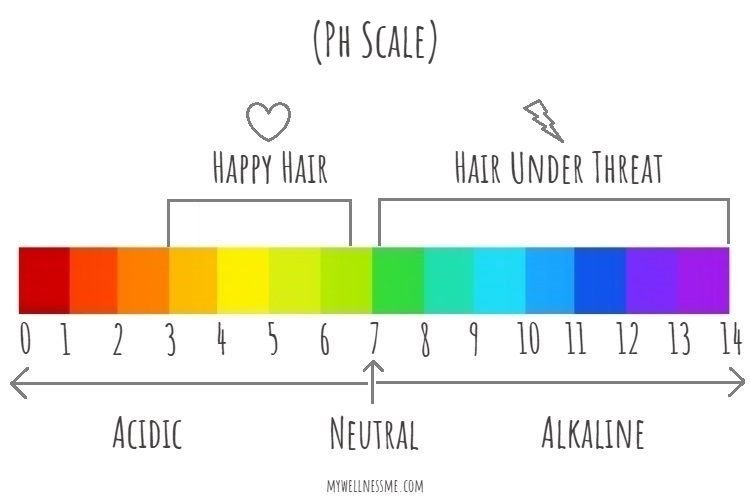
If by any chance it is inching towards 7 or has crossed that number, you can use a pH neutralizer like lemon, which has a very low pH level (2). Incorporate one tablespoon at a time into the mixture till you get the desired result.
Why is all this important?
The insides of our hair shafts are protected by scales called cuticles. Alkaline substances tend to open these scales, making the insides vulnerable. An acid-based shampoo (as shampoos should always be) closes the cuticles, which keeps the hair shaft moisturized.
One more thing:
If you are using a conditioner to go with your shampoo, make sure that the difference in pH is minimal. For example, you do not use a conditioner with a pH of 3 to go with shampoo that has a pH of 7.
So why these ingredients
Shikakai (Acacia concinna): If there was any herb destined for hair care, this is it. With a name that translates literally to “fruit for hair” you can’t go much wrong. Besides being a trusted surfactant for thousands of years, shikakai is also capable of making the hair smooth and soft. The herb is also rich in phytonutrients and vitamins C and D and often used for hair growth.
Reetha (Sapindus mukorossi): Like shikakai, reetha or Indian soapberry has been used as a cleanser for millennia, owing to the presence of natural surfactants called saponins. Besides being sustainable, reetha is also ideal for individuals who are allergic to chemicals used as foaming agents (parabens and sulfates) in commercial hair products.
Indian gooseberry/Amla (Phyllanthus emblica): The third of this trusted trinity of Ayurveda hair treatment is full of antioxidant and antimicrobial properties. This helps to keep the scalp nourished and strong, plus amla is often used for hair growth and to prevent premature gray hair.
Hibiscus (Hibiscus rosa-sinensis): This flower is rich in amino acids and vitamin C, which promotes blood circulation under the scalp and also hair growth.
Neem (Azadirachta indica): Neem leaves have antibacterial and antifungal properties and their high fatty content can contribute to a healthy scalp. They are also effective in combating dandruff.
Holy basil (Ocimum tenuiflorum): This plant is rich in vitamin K and antioxidants and, like neem, nourishes the scalp and can be used to treat scalp dryness and dandruff.
Fenugreek (Trigonella foenum-graecum): The seeds of this plant have high protein content that can be effective against conditions like thin hair, baldness and dry scalp.
Rose (Rosa): The petals of this flower have anti-inflammatory properties which can treat scalp dryness and itchiness. Besides, its pH value is similar to that of hair, so rose can be helpful in maintaining the pH balance of the scalp and hair.
Waterhyssop/Brahmi (Bacopa monnieri): This herb augments blood circulation in the scalp. It is also full of alkaloids which strengthens hair root and as a result promotes hair growth.
Green gram (Vigna radiate): Rich in calcium, fiber, magnesium and vitamins B and C, green gram nourishes the scalp and promotes hair growth.
Sandalwood (Santalum album): Sandalwood, much like the other ingredients in the list, nourishes the hair and scalp. Some reports say that hair follicles can detect odors. Who knew that they fancy the warm smell of sandalwood so much that it makes them come alive?
If there is any ingredient in the list that does not do it for you, there are alternatives you can use.
Other ingredients that are commonly used in DIY Ayurvedic shampoos
Cinnamon and cloves; aloe vera (Aloe barbadensis miller); bhringraj/false daisy (Eclipta prostrate or Eclipta alba); henna; pomegranate peel; haritaki/chebulic myrobalan (Terminalia chebula); flaxseeds; and winter cherry/ashwagandha (Withania somnifera).
For oily hair, fuller’s earth or oatmeal powder is also added.
You can craft a mighty fine natural DIY Ayurvedic shampoo with these ingredients but first please do your research and consult an Ayurvedic practitioner.
Also, be aware that there are some alkaline-based ingredients listed above, like gram seed and neem, which can be bad news for the hair. That is, if you get the measurements wrong.
Here, take a pH tester to check if your shampoo mix is within the safe limits.
Things to remember while making your DIY Ayurvedic shampoo
I have seen a number of DIY shampoos recommending the use of coconut oil, which is something I will not do in a hurry.
Why?
Because a mixture of coconut oil and water needs an emulsifier to work properly. Commercial products use potentially harmful chemicals and a controlled environment to keep water and oil from separating. Most times, this process requires two or more emulsifiers.
It’s not that there are no natural emulsifiers.
Honey and egg yolk are frequently used to do the job. But personally I have not used them and so cannot vouch for their effectiveness. Also, I prefer my DIY shampoo oil-free.
Another aspect is that I consciously take care of is to store my water-based DIY Ayurvedic shampoo in the refrigerator. If someone suggests you can keep them in the bathroom, ignore the suggestion.
Room temperature and a moist environment encourage microbial growth. Bacteria thrive in water-based solutions and without preservatives it’s carnival time for them.
So, if you have made more shampoo than you intended to, use it up quickly or share with your friends.
Another big no-no is Castille soap. This may raise some eyebrows as Castille soap is a seemingly ubiquitous product in DIY shampoos nowadays. My hesitation is simply based on its pH value – Castille soap measures about 9 on the pH scale!
I know, I know, we can balance the discrepancy using a neutralizer but “9” on the pH scale is just nasty. Better safe than sorry.
Side-effects of shikakai and reetha
Shikakai is great for the hair but can burn the eyes. It can also cause lung irritation if you inhale, so may not be the best choice for people with asthma. Reetha on the other hand is good for asthma so such individuals can skip shikakai and add more reetha.
Shikakai and amla both have the ability to darken the hair so if you have blonde hair, it’s advisable to skip them. Simply go with reetha and other ingredients.
Using just shikakai or reetha can lead to dry hair, as they are very good natural cleansers but don’t possess the same nourishing ingredients that others do.
Use of herbs is a lifestyle
As with all things, balance is necessary.
And if you are prone to allergy and not too confident about concocting a “safe” shampoo, consult a medical professional. Ideally, she or he should be an Ayurvedician. But, if such an individual is not available in your locality, seek the opinion of someone with a better knowledge of the human body than you.
And, I’ll say it again – take a patch test for allergy.
Also, for any treatment to work on your body, other factors are important. For example, the benefits of an Ayurvedic DIY shampoo may appear sooner for someone with a healthy gut and an active lifestyle. (Read about how to create an eco-friendly fitness routine.)
Have you tried an Ayurvedic shampoo? How do you feel about making one yourself? Let us know in the comments.
8 comments
I have asthma, so sounds like this isn’t for me, but I like that your making your own shampoo, such a cool idea.
I had forgotten to add that reetha is actually good for asthma (added this in the article now), so you can skip shikakai and add more reetha in its place. 🙂
I especially appreciated the easy-to-understand manner in which the pH has been explained. No shampoo is duping me now lol. Thanks for sharing and hope to read similar posts.
Glad you found this useful 🙂
Wow, love the colorful spread of all the ingredients and the explanation behind each one! Nothing says ‘good hair shampoo’ better then a step-by-step as to why each ingredient has been chosen. I have short hair so I will not be needing a bucket, but I cannot wait to try this out!
Thanks Jaya! I love how easy this shampoo is to make. It’s just mixing powders in the right measurements. You can also use fresh ingredients for all barring shikakai and reetha but the process is lengthier where you have to boil and strain them.
I find it so cool that this is something we can actually do and be 100% natural is genius. I will start shopping for the ingredients and give it a try.
Oh yes absolutely! It’s natural and healthy and it’s easy to make. Checks all boxes in my book. Here’s to beautiful hair.
Comments are closed.